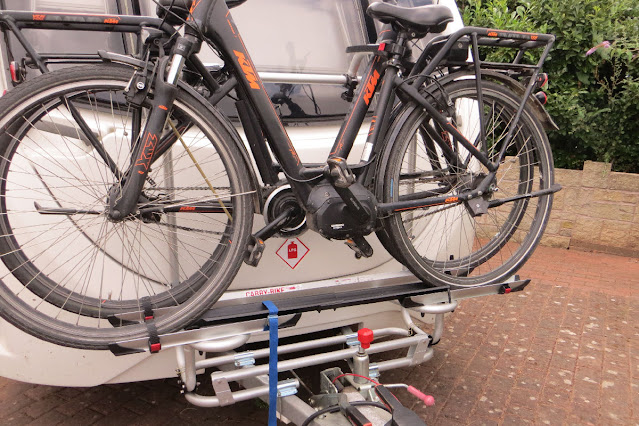
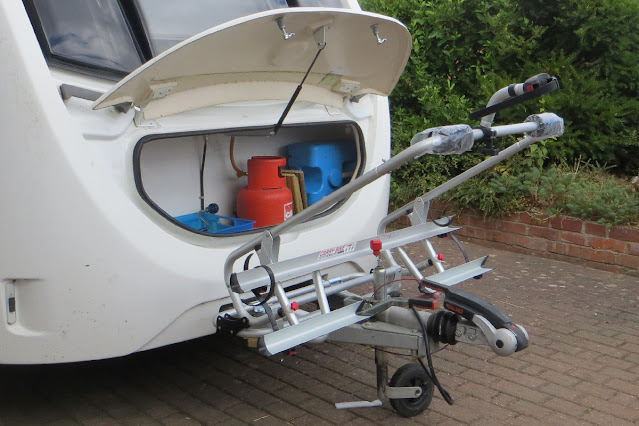
This examines the pros and cons of fitting a Fiamma XLA Pro 200 bike carrier to a Sprite Alpine 2. Lessons learned would of course apply to other caravans.
The underlying issue is how best to transport two e-bikes, each weighing 22Kg without batteries. For a few years now we have been splitting the load between the caravan and car. A Thule bike rack on the back of the van took one bike and a towbar plate mounted bike rack on the car took the second. Two bikes on the Thule rack was not possible without exceeding the rack the load limit, and I wouldn't have been happy having such a weight on the rear anyway. The height of the Thule rack (dictated by the built in Swift fixing points) has been an ongoing problem for us as we are late 70's and find lifting the e-bike to such a height increasingly a problem, It's also tedious having to secure the car mounted bike each time. So it was time to have a fresh look for alternatives and the A-frame mounted Fiamma popped up for consideration.
I homed in on Fiamma XLA Pro 200 rack with a capacity of 50Kg, and costing £280 from LeisureOutlet.com. Before ordering I had some decisions to make.
- Would I be happy to lose the white plastic A-frame cover? This has to be removed permanently in order to fit the rack. I baulked at the prospect of a naked A-frame but was surprised how quickly I came to accept it after I fitted the rack. Removing the cover is easy when you know how, seemingly impossible if you don't. The trick is to remove the two front screws and then use a large screwdriver to lever off the cover from the front, inserting wooden wedges as gaps are opened up in order to maintain pressure. The non-setting sealant that retains the cover gradually gives way and the cover simply lifts off.
- Would I be able to comply with the maximum 70Kg nose weight specified for my Citroen Picasso car? I did a few calculations and decided to move the spare wheel from the gas locker to the wardrobe at the back of the van. This necessitated moving the wardrobe shelf up by 2", a tedious but fairly straightforward operation. The tyre could then be installed below the shelf, using the securing cone from the gas locker.
- Would I be able to meet the plated MTPLM limit of 1208Kg. To assess this I went back to basics, starting with the MRO of 1087Kg and creating a spreadsheet of everything in the van. A few observations here may help others thinking of going this way:
- we no longer carry the Sprite table so that's 7Kg in our favour
- unlike most caravaners we don't have an awning to lug round
- I discovered that the MRO includes an allowance for the heavy hook-up cable and a 20Kg allowance for a battery. There's also an allowance for a gas bottle. Apparently the battery allowance came in for 2011 vans onward.
- the mover system at 32Kg was the single biggest item after the bikes
With everything accounted for the spreadsheet showed I had 10Kg spare - which we'd need for food. So as not to exceed this we've decided to carry heavy items, especially drinks, in a box in the car.
At this point I discovered that I could buy an extra 41Kg MTPLM by paying £95 to Swift. For this they would send me a new side plate but nothing at all changes on the van. There is a plate in the gas locker showing max axel load and they simply up the MTPLM figure to reflect this limit. So they require £95 to correct the artificially low MTPLM figure shown on the side plate. And from what I can glean the reason it's so low is so that they can attract a wider range of tow cars (the combined legal combo limit of 3,500Kg is the all important factor here). So it's low as a deliberate marketing ploy. Paying £95 for nothing other than a technical adjustment was something I was delighted not to need, even though it would have given me a huge leeway on loading.
So having checked the basics I ordered the rack, but before ordering I checked the returns policy - just in case! There are 4 U-shaped threaded sections that retain the frame on the A-frame section and these have to be hacksawed down - obviously at that point the carrier is non-returnable. So I used wooded packing pieces below the U sections to take up the extra length. This way I could fit everything together temporarily without hacksawing the threaded bars. Only when I was convinced I had a workable system did I saw them to length and do the final fitting. The following photo shows everything in situ with temporary wooden blocks under the A frame section.
An important check was for interference between bikes and car. There are two photos below, for different angles (inset photo) and there doesn't seem to be an issue.
Getting the bike up on the carrier without lifting it is a bit of an acquired skill. I raise the front wheel, place it on the rail, then lift the rear of the bike to wheel the bike on to the support rail. The outer rail however has a gap in it so I used a metal section I had from another carrier as a temporary bridge. Shown in black on the following photo.
The bikes wobble a lot so well placed straps to the two caravan handles are essential. Folding down the carrier for locker access is easy, but I really wouldn't want to do it with the heavy bikes on. Best to put essential tools in the car boot.
My nose weight is 60Kg, nicely below the 70Kg car max. And I'm within the caravan's MTPLM. Ready for the road.


Thanks for this comprehensive article. I am looking to do the same. My only confusion is whether you used the XLA pro 200 or the XLA pro 200 e-bike? I think they are very similar but the e-bike version has the 50kg limit whereas the other has a 32kg limit? Fitting wise I be,I’ve they require the same amount of space. Thanks again.
ReplyDeleteI’ve since discovered that the XLA pro 200 bike rack was updated in 2023. Prior to that it weighted 7.5kg and carried 35kg. After, it weighed approx. 9.5km and carries 50kg (bike or e-bike). There is a separate e-bike rack which I haven’t considered. I wanted the tilting access to the gas locker. I have now ordered one and will update this once I’ve fitted (attempted to!) the bike rack. Finger crossed it all goes according to plan. At this point it looks promising!
Delete